June 30, 2011

ARUGULA KIWI SUMMER SALAD WITH HERBS (a 1-2 banana difficulty)


Summer is a great time to enjoy salads!  They are cool, refreshing, & great tasting.  I made this one look fancy just because I was going to post about it.  Usually it is just thrown into a bowl & enjoyed.  Fruit & fresh herbs are great ways to add variety and healthy goodness to salads.  Avocado, Walnuts, & Cheese are pretty much salad staples for me and this salad was no different.  Seriously, 'anymonkeycan' make great summer salads.

WHAT YOU NEED:
(pretty much everything is to taste)
1-2 Kiwi (sliced like medallions)
Arugula (or your favorite lettuce/spinach)
Herbs (chopped- today was cilantro, chives, & fennel)

(everything else is pretty much optional)
Carrot (thinly sliced)
Walnuts (crushed)
Avocado (sliced)
Dried Cranberries
Kosher Salt
Olive Oil
Balsamic Vinegar
Cheese (finely grated- stella fontinella for me)

WHAT ELSE YOU NEED:
Cutting Board
Paring Knife
Chef's Knife
Vegetable Peeler
Small Spoon
Cheese Grater

WHAT YOU DO:

1.  Slice Kiwi in half along equator.  Carefully use Spoon to scoop out kiwi from each half.  Discard/Compost the fuzzy, outer Kiwi peel.  Use Knife to cut into thin medallions.  Arrange on the plate.

2.  Thoroughly Rinse the Arugula.  Tear into bite size pieces.  Place in middle of the Kiwi medallions.

3.  Chop up the Herbs, then sprinkle on top of the Arugula.

4.  With the Peeler, thinly slice carrot slivers onto your salad.

5.  Sprinkle on the Walnuts, Dried Cranberries, & Salt.

6.  Cut Avocado lengthwise, remove the seed, then use the Spoon to Scoop out the Avocado "Meat."  Discard/Compost the outer skin.  Thinly slice the Avocado & add to the salad.

7.  Sprinkle with Cheese.

8.  Drizzle with the Olive Oil & Balsamic Vinegar.

9.  Enjoy!!

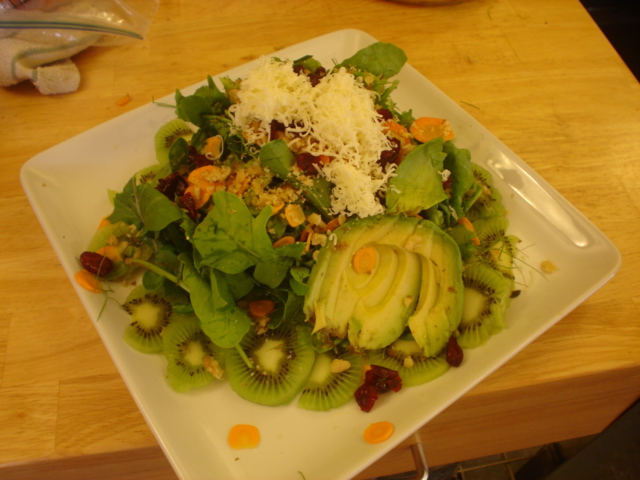
Viola!! A tasty, summer salad that 'anymonkey' just made. For the record, I use about 1/3-1/2 of the Avocado, 1/2 a carrot, 2 T Walnuts, 1-2 Kiwi, 2-3 T Cheese, 1-2 "loose" c Arugula for each salad. Mint would be a great herb to use in this as well.  Be creative!

(Below are photos with each step)
1. Slice Kiwi in half along equator. Carefully use Spoon to scoop out kiwi from each half. Discard/Compost the fuzzy, outer Kiwi peel. Use Knife to cut into thin medallions. Arrange on the plate.


2. Thoroughly Rinse the Arugula. Tear into bite size pieces. Place in middle of the Kiwi medallions.
3. Chop up the Herbs, then sprinkle on top of the Arugula.


4. With the Peeler, thinly slice carrot slivers onto your salad.


5. Sprinkle on the Walnuts, Dried Cranberries, & Salt.


6. Cut Avocado lengthwise, remove the seed, then use the Spoon to Scoop out the Avocado "Meat." Discard/Compost the outer skin. Thinly slice the Avocado & add to the salad.

7. Sprinkle with Cheese.


8. Drizzle with the Olive Oil & Balsamic Vinegar.
9. Enjoy!!


MOSTLY MADE FROM SCRATCH BANANA PUDDING (a 3 banana difficulty)


There is just something special about Banana Pudding and it's about time that 'this monkey' posted a Banana Pudding recipe.  I like to call this the "Made from Scratch (except for the Vanilla Wafers)" Banana Pudding.  Let's get started!


Salt not pictured

WHAT YOU NEED:
1 c Sugar
3 T Flour
1/4 t Salt
3 c Milk (Whole or 2%)
4 Eggs
3 T Unsalted Butter (cut into 3-4 pieces)
1-2 t Vanilla Extract
70 Vanilla Wafers (about a box) - reserve about 10-15 for topping
5 Ripe, but Firm Bananas (sliced)
Whipped Cream (optional)

WHAT ELSE YOU NEED:
Measuring Cups & Spoons
Liquid Measuring Cup
Large Bowl
Large Spoon
Knife
Whisk
Medium Sauce Pan

WHAT YOU DO:
1.  Mix the Sugar, Flour, & Salt together in the Sauce Pan


2.  Slowly Stir in 3 c Milk, then Heat over Medium Heat
3.  Thoroughly Whisk in 4 Eggs & Add the 3 T of Butter

4.  Stir constantly while heating over Medium Heat until the mixture begins to thicken (about 15-20 min, so be patient and start steps 5 & 6).


5.  Thinly Slice the Bananas.  I'll stir, then slice 1 banana, then repeat until all bananas are sliced.

6.  For the topping, Crumble 10-15 Wafers gently between 2 stackable bowls/plates or between plastic wrap using a rolling pin or bottle.  Be sure to continue stirring from #4 as needed

7.  Mix the Remaining Wafers & Banana Slices together. 


8.  After the mixture finally begins to thicken, vigorously stir while bringing to a simmer & Cook for 1 min.
9.  Remove from heat, then Stir in the Vanilla Extract

10.  Pour the Liquid into the Large Bowl over the Bananas/Wafers making sure all Banana pieces are submerged.  Top with Wafer Crumbles, then cover with plastic wrap pressing directly onto the surface.

11.  Refrigerate AT LEAST 6 hours, but overnight is better!

12.  Enjoy your Banana Pudding!


That's it!  'Anymonkeycan' make this Banana Pudding.  Just be sure to be patient in #4 and allow the mixture to thicken.  Also, in #7 you could meticulously layer the Wafers & Bananas, but I prefer Entropy!!  I can take or leave the whipped cream.  It is that good!

June 12, 2011

GUACAMOLE (2 banana difficulty)


It's summertime and Guacamole is oh so good and goes with oh so many things.  Every monkey should know how to make fresh guacamole from scratch since it is easy stuff.  Today, 'This Monkey' will show you how to make fresh guacamole!

WHAT YOU NEED:
1 Medium Onion (preferable white)
1 Large Green Pepper (or 2 Jalapenos if you like some spice in your life)
3 Garlic Cloves (peeled)
2 Medium Tomatoes (firm & ripe)
3 Large or 4 Medium Avocados (ie Hass)
4 T Cilantro (chopped)
Fresh Lime Juice from 2 Limes
1 t Kosher salt or to taste
1/2 t Sriracha Sauce or to taste

WHAT ELSE YOU NEED:
Medium Mixing Bowl
Food Processor (mini FP works well)
Chef's Knife skills
Fork & Spoon

WHAT YOU DO: (using a mini FP)
1.  Cut Onions & Peppers in 2" pieces, then cut into 1/4" pieces in food processor by pulsating for 1 sec, 10-15 times.  Then scoop into your Medium Bowl


2.  Peel the Garlic, place in food processor & pulsate in 1 sec bursts until minced, about 10-15 times.  Scoop into Medium Bowl.
3.  Repeat Step 1 using your Tomatoes.
4.  Using a knife carefully cut your avocados in 1/2 lengthwise & remove the pits with your spoon.
5.  Gently score your avocado meat like a tic tac toe board being mindful not to cut into the outer skin.
6.  Using your spoon, scoop out the avocado meat into the medium bowl.  Discard or Compost the Avocado skin.

7.  With your Fork (or a potato masher), mash together the avocado with the everything in your bowl.
8.  Add the chopped Cilantro (can be done in the mini FP in 1 sec bursts), Lime Juice, Kosher Salt, & Sriracha Sauce (optional) & mix thoroughly.


9.  Serve immediately or store in the refrigerator with plastic wrap placed directly on the guacamole to reduce browning.
10.  Enjoy!!
Making Guacamole is a bit like making pesto.  You follow the basic guidelines, but add your own touches.  In the above I left out the tomatoes because I didn't have any.  I like the taste of cilantro and lime juice so I emphasize those flavors.  I also like a bit of spiciness so that's where the Sriracha sauce makes an appearance.  I had some Bell Peppers in my garden so that was my pepper choice, otherwise it would have been Jalapeno! 

See, 'anymonkeycan' make great Guacamole because this one just did!!

June 6, 2011

WHOLE WHEAT BREAD (a 2 banana difficulty)


On the surface, homemade bread sounds like it would be difficult and time consuming.  In fact, it is quite easy and while the hands on time is quite brief, the rise time stretches it out to 1 full day.  That really doesn't count as OUR work though.

The recipe I mainly use is from a Mark Bittman NY Times recipe that he got from someone else.  He recently said it was "his" most popular recipe that wasn't "his" recipe.

Making bread is interesting because the humidity level and temperature in your house will affect your finished product.  As long as you are ok with that and realize that your loaves will have "uniqueness" to them, let's get started. 

WHAT YOU NEED:
3 c White Whole Wheat flour
2 T Vital Wheat Gluten (optional)
2 T Kosher Salt
1 1/2 t Yeast
2-3 T Olive Oil
1 3/4 c Warm Water


WHAT ELSE YOU NEED:
Dry Measuring Cups
Liquid Measuring Cups
Measuring Spoons
Large Bowl
Whisk
Plastic Wrap
Loaf Pan
Oven
Cooling Rack (optional)

WHAT YOU DO:
1.  Whisk Flour, Vital Wheat Gluten & Salt together in large bowl
2.  Dissolve Yeast in 1 c of the Warm Water & Pour over the dry ingredients
3.  While stirring, slowly add the remaining water. 
4.  Stir until blended.  At this point the dough should have the consistency of a thick batter.  Add a little more water if it seems too dry or a little more flour if it seems too wet.


5.  Cover the bowl with plastic wrap & let it rest in a warm place (ie: on top of the refrigerator) for 12-24 hours.
6.  The surface will be dotted with bubbles when it is ready.


7.  Grease the sides & bottom of the loaf pan with the olive oil, then pour/scrape the dough into the loaf pan.  Cover with a towel.

8.  Let this rest 1-2 hours allowing it to rise.  Pre-heat oven to 400 deg when it is close to baking time.
9.  Bake until it sounds hollow to tapping (30-45 min.)  An instant read thermometer should register close to 200 deg.


10.  Let it cool about 30 min, then use a thin knife to loosen around the perimeter.  You may need to cut out a small end piece and use a spatula to fully disengage the bread from your pan.


11.  Your bread is now ready to eat!!

If you want your bread to always be nice, soft & the same size, then you will be disappointed in home made bread.  Just keep on going with Mrs. Baird's at your grocery store.  However, if you love the smell of fresh baked bread, then definitely give this a go.

Parting thoughts:
Your bread does NOT have any preservatives in it, therefore it will only last 2-4 days before it starts to become a science experiment.  You may need to cut your bread into thirds & store in the refrigerator.  When I'm ready to use the bread, I'll remove from the fridge, slice what I need, then warm in my toaster oven at 250 for about 5 min.

The Vital Wheat Gluten enhances the bread's texture & elasticity.

Well, be flexible with this bread.  You can definitely add about 1/4 c nuts at step 7 before pouring the dough into the the loaf pan.  Play around with the flours a bit also.  Just remember to be flexible.  Bread is not perfect which is good because 'anymonkeycan' bake a good, but not perfect loaf of bread!