December 21, 2013

ROASTED CARROT GINGER SOUP (a 2 banana difficulty level)

This probably should be called "Roasted Root Vegetable & Ginger Soup" since Carrots, Onions, Garlic, & Shallots are all roasted, but that just doesn't sound as appealing as "Roasted Carrot Ginger Soup"!

Even in Texas we have soup weather & we are definitely in soup weather!

Today, 'this monkey' will show you how to make "Roasted Carrot Ginger Soup"

WHAT YOU NEED:
2 lbs of Carrots (washed, dried, cut length-wise & chopped in 3-4” sections)
1 Yellow Onion (cut in 1” cubes)
4-6 Garlic Cloves (peeled)
1 Shallot (peeled & cut in 1" sections)
1 T Fresh Ginger (Grated)
2-3 T Olive Oil
Kosher Salt
Freshly Ground Black Pepper
1 c White Wine
6 c Chicken/Veggie Broth
½ c Whole Milk
¼ c OJ
Sirachi Sauce to taste (8-10 drops)
1 T Soy Sauce

WHAT ELSE YOU NEED:
Roasting Pan
Large Bowl
Chef’s knife
Cutting Board
6 qt Pot
Blender

WHAT YOU DO:
1. Pre-heat oven to 450 deg.

2. Add Carrots, Onions, Garlic, & Shallots to large bowl. Coat the veggies with Olive Oil & Sprinkle with Salt.

3. Place the veggies in the Roasting Pan & Roast 30-45 minutes. Be sure to stir every 8-10 minutes. 
I have a bit of an overcrowding issue when roasting veggies...

...it may take closer to 45 minutes, but I still get great roasted veggies!

4. Place the Roasted Vegetables & Grated Ginger in the 6 qt pot over Medium Low heat for 5 min.


5. Increase heat to Medium High & add wine. Cook until wine is reduced by half, about 5-7 minutes.
6. Add Broth & cook until just begins to boil. Reduce heat to medium low & cook for 5 minutes.


7. Puree the veggies either with an immersion blender or with a Regular Blender (Vita-Mix) working in batches. 
8. Return (if using a regular blender) the pureed veggies to the pot. Add Milk, OJ, Soy Sauce, & Sirachi Sauce. Cook until the desired temperature for soup, but do not return to a boil. 

9. Serve & Enjoy!

There you go...some "Roasted Carrot Ginger Soup." I chose NOT to peel the carrots, just wash & dry them. I felt the soup came out great, plus less work is less work!

I'm a big fan of soup add-ins, so I enjoy this soup with Triscuets, some Avocado, & grated cheese.

Merry Christmas & Until next time...your favorite neighbor-web, Monkey!

November 26, 2013

LEFTOVER TURKEY 'not chicken' SALAD (a 1 banana difficulty level)


Ah yes...it's that time of year again...Thanksgiving! Let the gluttony begin!

We did a pre-Thanksgiving meal this past weekend and now have a fair bit of leftover turkey. If you are still in the market for how to cook that Thanksgiving bird, may I suggest:

http://www.anymonkeycan.com/2011/11/braised-turkey-3-banana-level.html

It's made 3 straight Thanksgivings for me! Did I mention the Leftover Turkey soup that you can make?

http://www.anymonkeycan.com/2011/11/turkey-lentil-rice-soup-2-banana.html

Ok, enough with the self promotion. I recently saw a presentation about The Goldring Center for Culinary Medicine (http://tmedweb.tulane.edu/mu/teachingkitchen/). Pretty cool stuff! The med school at Tulane offers this as an elective to med students. The med students end up teaching healthier cooking to the community. The concept is to see if making some minor modifications will improve health & decrease the impact of chronic diseases. Basically using food as medicine as opposed to lots of pills for medicine. Like I said, pretty cool stuff.

This "Leftover Turkey Salad" is based off of the Chicken Salad Recipe from the Goldring Center.

Today, 'this monkey' will show you what you can do with some of your leftover turkey & celery!

WHAT YOU NEED:
3 c. COOKED Leftover Turkey - diced
1 T Mayo (optional)
1/2 c Plain Yogurt (I used Greek)
1 T Dijon Mustard
2 T Apple Cider Vinegar
2 Celery Stalks - diced
1/2 c Pecans - chopped
1 Gala Apple - finely diced
4 T Craisins
Kosher Salt to Taste
Freshly Ground Black Pepper to Taste

WHAT ELSE YOU NEED:
Chef's Knife
Cutting Board
Medium Bowl
Mixing Spoon

WHAT YOU DO:
1. Mix the Mayo, Yogurt, Mustard, Apple Cider Vinegar, Salt & Pepper in the bowl until well blended.

2. Add the Diced Celery, Chopped Pecans, Diced Apple, & Craisins to #1 & stir until well incorporated.

3. Add the Diced Turkey to the above & stir well.

4. Make a sandwich & enjoy!


This was a breeze to make & is pretty good! Not quite as good as using mayo, but pretty close. I optioned out of the mayo, but will probably add just a bit next go 'round.

Here's hoping to a wonderful Thanksgiving!

Until next time...your favorite neighborweb monkey!

October 5, 2013

WALNUT ZUCCHINI BREAD (a 2 banana difficulty level)


This monkey likes his breakfast. 3 Egg Omelet (Spinach, Avocado, Chives, Cheese), 1 slice Walnut Zucchini Bread with Butter & 1 Black Plum with 1 cup of French Press Coffee

I was given this recipe over a year ago, maybe closer to 2 years. I've wanted to make it for quite awhile now. 3 times I've purchased Zucchinis & 3 times those Zucchinis have languished in my vegetable crisper until they were only fit for my compost bin.

Finally the stars aligned just enough that I had Zucchinis and the time to make Walnut Zucchini Bread and boy have I been missing out because it was delicious! Anymonkey likes more than just Banana Bread for his dessert breakfast breads!

My friend's recipe is from her grandmother. A good rule of thumb: recipes from grandmas = goodness!
Today, this Monkey will teach you how to make Walnut Zucchini Bread...let's get started!

Fun with Grated Zucchini!
WHAT YOU NEED:
GROUP 1:
3 Eggs
1 c Oil (I chose Olive Oil)
2 t Vanilla
2 c Sugar
2 c Grated, Peeled Zucchini (2 medium Zucchinis)


GROUP 2:
2 1/2 c Flour
1 1/2 t Baking Powder
2 t Cinnamon (I substituted Nutmeg)
1/2 t Salt
1 t Baking Soda
1 c Chopped Pecans (I substituted Walnuts)

WHAT ELSE YOU NEED:
Whisk
Large Spoon
Large Bowl
2 Loaf Pans

1. Pre-Heat oven to 350 deg.
2. In the Large Bowl, Beat together items in Group 1.
Pre mixing

Post mixing

3. In the Large Bowl, Add the dry ingredients of Group 2 into Group 1 ingredients. Combine thoroughly.


4. Pour Mixture into your loaf pans (or grandma's cast iron skillet...)

5. Bake at 350 deg for 50 minutes, rotate at 25 minute mark.

6. Serve Warm with a pat of Butter

Super easy to make & super delicious! Special thanks to Lacy & her grandma for their contribution...

Until next time (hopefully it will be sooner than later) your favorite neighborweb monkey!


April 13, 2013

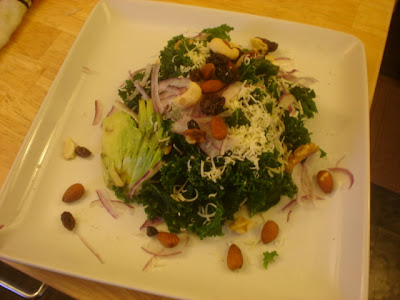
KALE SALAD (a 1 banana difficulty level)


This is blog post 100 (triple digits!) & I'm going to have to dedicate this post to Rudy.

Recently I met some neighbors who are into gardening. I mean, REALLY into gardening. In fact, one is a Texas Master Gardener. They decided to give me some of their extra kale not too long ago.


Other than throwing a small bit of Kale into a smoothie, I really had never used Kale for anything. I decided to embrace the monkey mantra of 'easily making great tasting food' and start with a simple Kale salad. Basically I made my standard Spinach Salad, but with Kale instead of Spinach. It turned out quite tasty!

The hardest part of this recipe is cutting the stems out of the leaves, but that is pretty simple.

Here's the 'anymonkeycan' version of a Kale salad:

WHAT YOU NEED:
Kale (cut to bite size pieces)
Purple Onion (sliced thinly)
Avocado (sliced)
Cheese (shredded - Stella Fontinella)
Trail Mix or Mixed Nuts
Kosher Salt & Ground Black Pepper to taste
Balsamic Vinegar

WHAT YOU DO:
1. Prep the Kale leaves by cutting away the stem & then chopping the leaves into bite size pieces.
The progression is from Left to Right:
1. Place Kale leaf on cutting board with stem away from you
2. Fold leaf in half along the stem                                          
3. Draw your knife along the leafy part & stem                      
4. Discard the stem & chop up the remaingin leaf                  

2. Massage the Kale leaves for about 3 minutes to soften them. They'll turn a deeper green.
Pre Massage
Post massage (deeper green)
Pre                                      Post

3. Build your salad


4. Drizzle with Balsamic Vinegar & Enjoy!

And there you have a Kale Salad that 'anymonkeycan' do!

Until next time...
Your favorite neighborweb monkey!

February 28, 2013

ROASTED CABBAGE (a 1-2 banana level difficulty)


I've been enjoying Roasted Cabbage recently, which I know sounds weird.  But when done right, it is REALLY good...almost addictive.  I've been experimenting with this a bit because the pieces tend to fall apart when roasted.  But, I think I have found the solution and it is the WEDGE!

By cutting the head of cabbage into eighths, it actually stays together well including during the flipping.  When it is time to serve, just cut away the fibrous white part (if you desire) to allow the pieces to fall apart.

Today, 'this monkey' will show you how to make Roasted Cabbage...Wedges!  Let's get started!

WHAT YOU NEED:
1 head of Purple Cabbage (or the cabbage of your choice)
3 T Extra Virgin Olive Oil
Kosher Salt (to taste)

WHAT ELSE YOU NEED:
Roasting Pan (cookie sheet will work but keep a close eye on it due to burning)
Fork

WHAT YOU DO:
1.  Pre-heat oven to 450 deg.  I pre-heat my roasting pan as well.  If you are using a cookie sheet, you may want to experiment pre-heating at a lower temp (?400 deg) to see if it does ok.
2.  Cut Cabbage into Eighths.


3.  Carefully remove pre-heated roasting pan & pour 2 T of Oil in the bottom & CAREFULLY swirl/tilt to coat the bottom of the pan.  Then sprinkle Kosher Salt along the bottom pan.  Add the Cabbage wedges.  Drizzle with rest of Olive Oil & Sprinkle with Kosher Salt.


4.  Roast for 15 min & then remove to flip the wedges with a fork (I've found a fork works better than tongs or a spatula.)
Partially roasted, but pre-flip.  Garlic cloves are pictured

Partially roasted and post flip

5.  Roast another 15 minutes.
Post Roast (completely)

6.  Keep the white fibrous part if you want to hold the wedge form, otherwise remove it to allow the leaves to separate & serve over rice etc!
a yellow bowl was not the best choice for the presentation, sorry.

My best advice to you, is to try Roasted Cabbage because I would not have believed it was so delicious either!

Enjoy & until next time...

your favorite neighborweb monkey!

January 31, 2013

APPLE & ALMOND BUTTER GRILLED CHEESE (1-2 banana difficulty)


A little over a year ago I did a Gourmet Grilled Cheese post:

http://www.anymonkeycan.com/2011/04/gourmet-grown-up-grilled-cheese-1-2.html

I've wanted to re-visit this topic and have finally been able to make it happen with the 'Adult' Apple & Almond Butter Grilled Cheese Sandwich!  Now before you knee-jerk a "Eew Gross!"  Think about this:

Apple Slices + Almond or Peanut Butter = Mmmm...good!

Apple Slices + Cheese Slices = Mmmm...good!

Therefore:

        Apple Slices + Almond Butter + Cheese Slices = Hmmm?

No, the answer is Mmmm...good!

Store bought Almond/Peanut Butter is fine, but if you want to make the Almond Butter yourself then:

For the Vitamixers:  http://www.anymonkeycan.com/2013/01/roasted-almond-walnut-butter-via.html

For the Food Processors:  http://www.anymonkeycan.com/2010/10/homemade-multi-nut-butter.html

Today, 'This monkey' will show you how to make an 'Adult' Apple & Almond Butter Grilled Cheese Sandwich!  Let's get started!

WHAT YOU NEED:
Sliced Bread (Today's Choice is Sour Dough)
Cheese - thinly sliced (Today's Choices are White Cheddar & Stella Fontinella)
2 T Butter per sandwich
3-4 T Almond Butter
Gala Apple - thinly sliced

WHAT ELSE YOU NEED:
Skillet
Spatula
Stove top

WHAT YOU DO:
1.  Prep the ingredients
The 2nd sandwich is a Basil Avocado Grilled Cheese, also an excellent choice!

2.  Thoroughly heat/melt 1 T of butter over Medium High Heat.

3.  While the butter is melting, start building your Grilled Cheese.  (Sandwich on the Right)
(step 1) Almond Butter on both sides & 1 layer of cheese.
(step 2) 1 layer of apple slices
(step 3) 1 more layer of cheese
(step 4) Close the sandwich & top with butter

4.  Cook for 2-3 minutes per side.

5.  Remove, Serve, & Enjoy!


6.  And what to do with the extra fixin's....
Serve on Crackers!

There you go!  The 2nd installment of Grilled Cheese Sandwiches!  Seriously...Give the 'Adult' Apple & Almond Butter Grilled Cheese a go!  Just be sure to thinly slice those apples!

Until next time...
your favorite neighborweb monkey!