January 19, 2013

ROASTED ALMOND-WALNUT BUTTER via VITAMIX (a 1 banana difficulty level)

Here's another Vitamix Recipe.  I've posted about making your own Walnut/Cashew Butter etc in a food processor.  Making the Almond Butter in the Vitamix was so much easier that I donated my food processor to Goodwill! 

The worst part of making your own Almond Butter is the clean up.  However with proper planning in the Vitamix you can follow up your Homemade Almond Butter with a Banana-Apple-Grape Smoothie that uses most of the leftover Almond Butter at the bottom of the Container!

Let's get started!

WHAT YOU NEED:
2 c Almonds
1 c Walnuts

WHAT ELSE YOU NEED:
Vitamix
Oven
Roasting Pan or Cookie Sheet

WHAT YOU DO:
1. Pre Heat the oven to 350 deg

 
2.  Take the 3 c of Almonds & Walnuts and evenly distribute in the Roasting Pan.  Roast for about 15 minutes.  Be sure to stir or shake 1-2 times to prevent burning. 
3.  Allow the nuts to cool for about 30-60 minutes. 
 
4.  Add the nuts to the Vitamix & secure the lid. 

Be sure to remove all monkeys prior to blending...
 
5.  Select Variable 1 & then quickly increase to Variable 7.  Using the tamper, press the Almonds & Walnuts until they are all broken down.  

 
6.  At this point, turn to Variable 10 & continue to work the Tamper until the Almond Butter begins to liquefy.
7.  Adjust to High setting for about 1 minute until Almond Butter is a thick consistency and begins to circulate in the Vitamix. 
(Be careful not to overheat your machine.  Turn off the Vitamix if the motor starts to labor)  


8.  Time to move the Almond-Walnut Butter to an airtight container. 

Gravity is your friend...sometimes!
9.  This way gets quite a bit into the container, but I'll also use a small rubber spatula to help the last little bits along the way.  Be VERY careful to stay above the blades because otherwise you will soon be missing parts of your rubber spatula!
 
10.  Make a smoothie with the residual Almond Butter! 
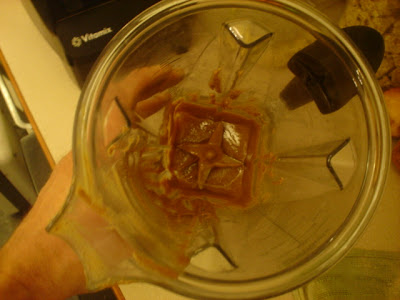
The start to a great smoothie!
 And that is it for the Homemade Almond-Walnut Butter...Vitamix-style! 


Enjoy & until next time...
Your favorite neighborweb Monkey!

January 13, 2013

HAPPY 2013!!


Well, well, well...I guess I better get the 'Happy 2013!' post taken care of while we are still in January...January 13th isn't terrible, is it?

2012 was definitely a slow year compared 2011.  My one post a month often was done just under the wire.  Taking classes all year will do that to a monkey!  I just wasn't able to plan & cook nearly as much as I like.  I have 2 more semesters to go & will be done at the end of the summer session & hope to start enjoying some more leisure time activities such as cooking!

I purchased a Vita-Mix Blender this year.  It was expensive, even buying the refurbished variety.  But let me tell you, it is impressive & I have NOT been disappointed with that purchase.  Plus, I was able to get rid of my Blender, Food Processor, AND the Ice Cream Bowl for my Kitchen Aid Mixer.  Having 1 small appliance take the place of 3 things is a big WIN in my book!

So, 2013 may start out slow again, but hopefully I will be able to finish the year strong!

Until next time,

Your favorite neighbor-web Monkey!

December 25, 2012

SOFT COOKED EGGS (a 1 banana difficulty level)


I don't think I ever had Soft-Cooked eggs growing up.  In the recent Cook's Illustrated they had a story titled "Foolproof Soft-Cooked Eggs."  That caused my Monkey ears to perk up because I'm a bit of a fool and if these were "Foolproof" then it might be worth a whirl.

The CI recipe calls for the eggs to be cooked precisely for 6 1/2 minutes.  I guess I like my eggs cooked to "Medium-Soft" because I've found that an even 7 works best for me...besides, my oven timer only uses minute increments!

Today, 'This monkey' will show you how to cook "Monkey-Proof Medium-Soft Cooked Eggs."

Let's get started!

WHAT YOU NEED:
1-6 Large Eggs
Kosher Salt (to taste)
Freshly Ground Black Pepper (to taste)

WHAT ELSE YOU NEED:
Tongs or Slotted Spoon
Medium Sauce Pan
Small Bowl

WHAT YOU DO:
1.  Over Medium High heat, bring 1/2 inch of water to a boil in the Sauce Pan.
2.  Carefully add the Eggs into the Boiling water.  (sorry for the "steamy" photos...)

**If an eggs happens to crack, then remove it immediately.  Otherwise your water will bubble up and boil over during the cooking.  Depending on how much egg entered your water, you may need to start over.**

3.  Cover the sauce pan & boil eggs for 7 minutes.
4.  Remove eggs from boiling water with tongs & place in the small bowl.
5.  Run under cold water for about 30-40 seconds.


6.  Crack the less pointy end & Peel.
7.  Season to taste with Salt & Pepper.
8.  Serve & Enjoy!

Like I said, I'm kind of new to Soft Cooked Eggs.  To me, they make a nice little snack or side to breakfast.  I've tried them with some Spinach Salads, but I wasn't a big fan of them being warm.  Maybe they'd work better if they were cooled a bit.  I've also included them with some rice & cous-cous dishes where they've worked pretty well.

Enjoy & until next time...

Your favorite neighbor-web monkey!