February 28, 2013

ROASTED CABBAGE (a 1-2 banana level difficulty)


I've been enjoying Roasted Cabbage recently, which I know sounds weird.  But when done right, it is REALLY good...almost addictive.  I've been experimenting with this a bit because the pieces tend to fall apart when roasted.  But, I think I have found the solution and it is the WEDGE!

By cutting the head of cabbage into eighths, it actually stays together well including during the flipping.  When it is time to serve, just cut away the fibrous white part (if you desire) to allow the pieces to fall apart.

Today, 'this monkey' will show you how to make Roasted Cabbage...Wedges!  Let's get started!

WHAT YOU NEED:
1 head of Purple Cabbage (or the cabbage of your choice)
3 T Extra Virgin Olive Oil
Kosher Salt (to taste)

WHAT ELSE YOU NEED:
Roasting Pan (cookie sheet will work but keep a close eye on it due to burning)
Fork

WHAT YOU DO:
1.  Pre-heat oven to 450 deg.  I pre-heat my roasting pan as well.  If you are using a cookie sheet, you may want to experiment pre-heating at a lower temp (?400 deg) to see if it does ok.
2.  Cut Cabbage into Eighths.


3.  Carefully remove pre-heated roasting pan & pour 2 T of Oil in the bottom & CAREFULLY swirl/tilt to coat the bottom of the pan.  Then sprinkle Kosher Salt along the bottom pan.  Add the Cabbage wedges.  Drizzle with rest of Olive Oil & Sprinkle with Kosher Salt.


4.  Roast for 15 min & then remove to flip the wedges with a fork (I've found a fork works better than tongs or a spatula.)
Partially roasted, but pre-flip.  Garlic cloves are pictured

Partially roasted and post flip

5.  Roast another 15 minutes.
Post Roast (completely)

6.  Keep the white fibrous part if you want to hold the wedge form, otherwise remove it to allow the leaves to separate & serve over rice etc!
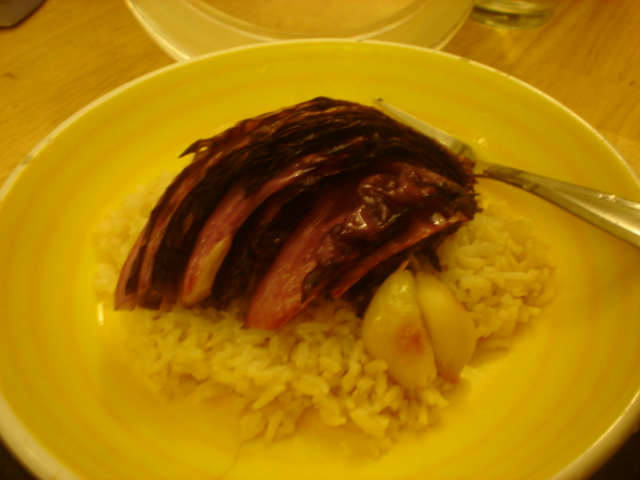
a yellow bowl was not the best choice for the presentation, sorry.

My best advice to you, is to try Roasted Cabbage because I would not have believed it was so delicious either!

Enjoy & until next time...

your favorite neighborweb monkey!

January 31, 2013

APPLE & ALMOND BUTTER GRILLED CHEESE (1-2 banana difficulty)


A little over a year ago I did a Gourmet Grilled Cheese post:

http://www.anymonkeycan.com/2011/04/gourmet-grown-up-grilled-cheese-1-2.html

I've wanted to re-visit this topic and have finally been able to make it happen with the 'Adult' Apple & Almond Butter Grilled Cheese Sandwich!  Now before you knee-jerk a "Eew Gross!"  Think about this:

Apple Slices + Almond or Peanut Butter = Mmmm...good!

Apple Slices + Cheese Slices = Mmmm...good!

Therefore:

        Apple Slices + Almond Butter + Cheese Slices = Hmmm?

No, the answer is Mmmm...good!

Store bought Almond/Peanut Butter is fine, but if you want to make the Almond Butter yourself then:

For the Vitamixers:  http://www.anymonkeycan.com/2013/01/roasted-almond-walnut-butter-via.html

For the Food Processors:  http://www.anymonkeycan.com/2010/10/homemade-multi-nut-butter.html

Today, 'This monkey' will show you how to make an 'Adult' Apple & Almond Butter Grilled Cheese Sandwich!  Let's get started!

WHAT YOU NEED:
Sliced Bread (Today's Choice is Sour Dough)
Cheese - thinly sliced (Today's Choices are White Cheddar & Stella Fontinella)
2 T Butter per sandwich
3-4 T Almond Butter
Gala Apple - thinly sliced

WHAT ELSE YOU NEED:
Skillet
Spatula
Stove top

WHAT YOU DO:
1.  Prep the ingredients
The 2nd sandwich is a Basil Avocado Grilled Cheese, also an excellent choice!

2.  Thoroughly heat/melt 1 T of butter over Medium High Heat.

3.  While the butter is melting, start building your Grilled Cheese.  (Sandwich on the Right)
(step 1) Almond Butter on both sides & 1 layer of cheese.
(step 2) 1 layer of apple slices
(step 3) 1 more layer of cheese
(step 4) Close the sandwich & top with butter

4.  Cook for 2-3 minutes per side.

5.  Remove, Serve, & Enjoy!


6.  And what to do with the extra fixin's....
Serve on Crackers!

There you go!  The 2nd installment of Grilled Cheese Sandwiches!  Seriously...Give the 'Adult' Apple & Almond Butter Grilled Cheese a go!  Just be sure to thinly slice those apples!

Until next time...
your favorite neighborweb monkey!

January 19, 2013

ROASTED ALMOND-WALNUT BUTTER via VITAMIX (a 1 banana difficulty level)

Here's another Vitamix Recipe.  I've posted about making your own Walnut/Cashew Butter etc in a food processor.  Making the Almond Butter in the Vitamix was so much easier that I donated my food processor to Goodwill! 

The worst part of making your own Almond Butter is the clean up.  However with proper planning in the Vitamix you can follow up your Homemade Almond Butter with a Banana-Apple-Grape Smoothie that uses most of the leftover Almond Butter at the bottom of the Container!

Let's get started!

WHAT YOU NEED:
2 c Almonds
1 c Walnuts

WHAT ELSE YOU NEED:
Vitamix
Oven
Roasting Pan or Cookie Sheet

WHAT YOU DO:
1. Pre Heat the oven to 350 deg

 
2.  Take the 3 c of Almonds & Walnuts and evenly distribute in the Roasting Pan.  Roast for about 15 minutes.  Be sure to stir or shake 1-2 times to prevent burning. 
3.  Allow the nuts to cool for about 30-60 minutes. 
 
4.  Add the nuts to the Vitamix & secure the lid. 

Be sure to remove all monkeys prior to blending...
 
5.  Select Variable 1 & then quickly increase to Variable 7.  Using the tamper, press the Almonds & Walnuts until they are all broken down.  

 
6.  At this point, turn to Variable 10 & continue to work the Tamper until the Almond Butter begins to liquefy.
7.  Adjust to High setting for about 1 minute until Almond Butter is a thick consistency and begins to circulate in the Vitamix. 
(Be careful not to overheat your machine.  Turn off the Vitamix if the motor starts to labor)  


8.  Time to move the Almond-Walnut Butter to an airtight container. 

Gravity is your friend...sometimes!
9.  This way gets quite a bit into the container, but I'll also use a small rubber spatula to help the last little bits along the way.  Be VERY careful to stay above the blades because otherwise you will soon be missing parts of your rubber spatula!
 
10.  Make a smoothie with the residual Almond Butter! 

The start to a great smoothie!
 And that is it for the Homemade Almond-Walnut Butter...Vitamix-style! 


Enjoy & until next time...
Your favorite neighborweb Monkey!