October 28, 2012

S'MORE HEATH RICE KRISPIE TREATS (a 2 banana difficulty level)


We were recently up in the Rocky Mountains of Colorado for my birthday weekend.  We knew we were going to roast marshmallows to make S'mores, but we always end up with a lot of leftover marshmallows.  So why not forgo the traditional birthday cake and make Rice Krispie Treats...Monkey-style!  Thus was born: "S'more Heath Rice Krispie Treats!"

As the name states, Rice Krispie Treats are a TREAT!  Although the Basic RKT is solid, adding some creativity can be wonderful.

So today, this 'birthday monkey' will show you how to make "S'more Heath RKT's!"  Let's get snap, crackle, & poppin'!

WHAT YOU NEED:
1/4 c Butter
10 oz package of Marshmallows (jumbo or  miniature)
5 c Rice Krispie Cereal
8 oz Heath Toffee Bits
4-6 Hershey Chocolate Bars (regular size)
14 oz Box of Graham Crackers

WHAT ELSE YOU NEED:
Large Sauce Pan
Spoon
13x9" pan (microwave safe)
Wax Paper or Rubber Spatula

WHAT YOU DO:
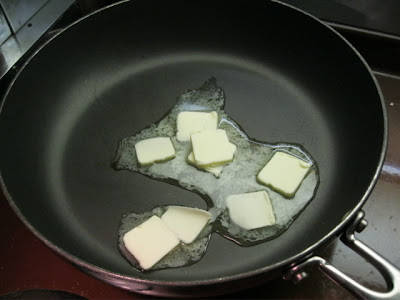
1. Melt Butter over Low Heat


2. Line bottom of pan with a Layer of Graham Crackers, a Layer of Chocolate, and HALF of the Heath Toffee Bits.
We didn't have a 13x9" pan.  This was the best we had.

We rationed some of the Hershey Bars for our yet to be made S'mores.  Ideally you would have a layer of Chocolate.


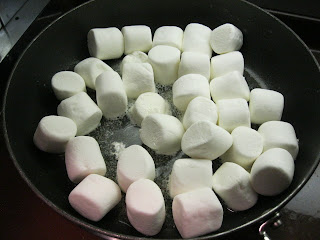
3. Add Marshmallows. Stir until Melted and smoothly Blended. Continue cooking AND stirring for 2 more minutes.


(4.  Microwave Graham Cracker/Chocolate Layer on LOW (50%) for 20-40 seconds until the Chocolate is Softened.)

5. Add remainder of Heath Toffee Bits followed by Rice Krispies into the melted Marshmallows until well coated.


 6. Transfer the Rice Krispie Mixture to your Pan and use the Wax Paper or a Buttered Spatula to evenly Spread the Rice Krispie Mixture over the Softened Chocolate.
We used the Wax Paper, but that was a bit messy.  Next time I'm trying the Buttered Spatula

 7. When Cooled, cut into at least 2x2" squares and Enjoy!


RKT's are fun and easy to make.  It's fun to experiment a bit and make Gourmet RKT's!

Until next time,
your favorite neighbor web monkey!


September 26, 2012

GRILLED SWEET POTATO MEDALLIONS (a 2 banana difficulty level)


Recently I have been grilling Red Potatoes and actually thought I had blogged in the recipe, but it appears that I have not.  This was my 2nd attempt at grilling Sweet Potatoes.  My first go 'round I followed the same technique that was working well with the Red Potatoes.  Evidently Sweet Potatoes grill faster because I ended up with blackened sweet potatoes which is no good for anyone!

A tweak here & a tweak there on the 2nd round made for a great batch of great tasting "Grilled Sweet Potato Medallions."  I opted for Sweet potatoes that were very large in circumference because I wanted to use them on a sandwich.  You could also slice them lengthwise or on a diagonal depending on the size of the Potato and what you wanted to use them for.

Today 'this monkey' will show you how to grill up some "Sweet Potato Medallions!"

WHAT YOU NEED:
2-3 Large Sweet Potatoes - in about 1/2" slices
3-4 T Extra Virgin Olive Oil
2-3 t of Sugar (I prefer Sugar in the Raw since the granules are larger)
Kosher Salt to taste

WHAT ELSE YOU NEED:
Large cookie sheet
Chef's Knife
Grill & Grill utensils

WHAT YOU DO:
**Be sure to Clean, Oil & Pre Heat your Grill.  I usually make sure the grill is clean, then I cut & prep the potatoes.  I'll then fire up the grill and let it pre-heat on high for 5 minutes before I reduce the grill heat & add the potatoes.**

1.  Rinse/Scrub & dry the sweet potatoes.


2.  Slice the Sweet Potatoes about 1/2" thick


3.  Coat the bottom of the Cookie Sheet with 2 T of Olive Oil & Sprinkle the Cookie Sheet with Sugar.  Place the sliced Sweet Potatoes on the Sheet, then Drizzle the tops of the Potatoes with Olive Oil & Sprinkle with Sugar.


4.  In your Pre Heated Grill, reduce Grill heat to LOW & place the Potato Medallions on the grill for 4-5 minutes.


5.  Flip the Medallions & Grill for another 3-4 minutes on Low.  Pay attention to any hotspots your grill may have to avoid blackened medallions!


6.  Remove from Grill

Grilled Portabello & Sweet Potato Medallion Sandwich with Avocado & Onion

Grilled Portabello & Sweet Potato Medallion Sandwich with Hummus
7.  Make your sandwich!


Sandwich & Salad deal:  Spinach Salad with Pine Nuts & Peppers
8.  Make your meal!


I added a little bit of sugar prior to grilling because that helps with the grill marks.  You can skip the sugar if you wish.  I will also cut the finished product in bite size pieces and toss in with rice, quinoa etc.  As for sandwiches, they are great hot or cold!

Until next time,
your favorite neighbor web Monkey!

August 30, 2012

HUMMUS via VITAMIX (a 2 banana difficulty level)


Well, I recently broke down and purchased a Vitamix Blender...well a refurbished one.  They are certainly expensive but so far it has been well worth it & I can see why "Cook's Illustrated" recommends it & Jamba Juice uses them to make your smoothie!  Speaking of smoothies, I recently took a break from making them to make some Hummus...Vitamix style!

I am basically following the recipe from the cookbook that came with the Vitamix Blender except I started with dried Chickpeas.  If you are using a food processor, then please refer to this recipe:

http://www.anymonkeycan.com/2010/09/hummus-foxymorons-style.html

Let's get started!

WHAT YOU NEED:
2-15 oz cans of Chickpeas (Garbanzo Beans); 1 drained & 1 with liquid;
or
**4 c of Cooked Chickpeas reserving 1-2 c of the liquid** (!!!soak overnight!!!)
1/4 c Raw Sesame Seeds
1-2 T Olive Oil
1/4 c Lemon Juice (from 2-3 Lemons)
1-2 Garlic Cloves (peeled)
1 t Cumin
2-3 t Kosher Salt

WHAT ELSE YOU NEED:
A Vitamix Blender or a Food Processor
Large Pot if using Dried Chickpeas

WHAT YOU DO:
**If you are using canned Chickpeas, Please skip to step 5**
1.  Dissolve 2 T of Kosher Salt in about 2 Quarts of Water in a large pot
2.  Rinse the Dried Chickpeas & add to the Salted water.  The water needs to cover the Chickpeas by about 2 inches because the Chickpeas will expand.  SOAK OVERNIGHT
3.  Drain & Rinse the Soaked Beans.  Place in Large pot & add water until Chickpeas are covered by 2 inches of water.  Cover, bring to Boil, then reduce heat & simmer for 30-45 minutes until the Chickpeas are nice & soft.  (IF YOU DID NOT SOAK OVERNIGHT, THEN YOU WILL NEED TO SIMMER FOR ABOUT 60-90 MINUTES)
4.  Save 1-2 c of the Liquid & drain the rest.

5.  Place all of the ingredients in the listed order into the Vitamix container.  Be sure to add 1 c of the reserved liquid if you cooked your own Chickpeas.  Secure the lid.


6.  Select Variable 1, then turn on the Vitamix & quickly increase the speed to Variable 10, then to HIGH.
7.  Blend for 1 minutes using the Tamper to press the ingredients into the Blades.
Initially this was TOO DRY

With just a little extra reserved liquid, this is now nice & creamy!
8.  Serve it up!
Another view of TOO dry.  It's kind of like a Khaki Play-doh which is bad!

This is more like it!

Well, that is about all there is to it.  The Vitamix Blender did a fantastic job.  Using Chickpeas from the can makes this such a simple recipe.  The hardest part is cleaning the Vitamix Container, but cleaning a food processor was just as big of a pain in the butt!

Until next time,
Your friendly Neighborweb Monkey!